A few weeks ago, I started using Evernote as my primary “blogging workbench.” It is where I store blog post ideas, collect various post components, and then write the post itself. This has proven to be a robust solution that enables me to be working on several posts simultaneously.

I thought I would share my workflow with you. Yours will be different, I’m sure. But, hopefully, this will provide you with a few ideas.
My go through the following six steps in creating a new blog post.
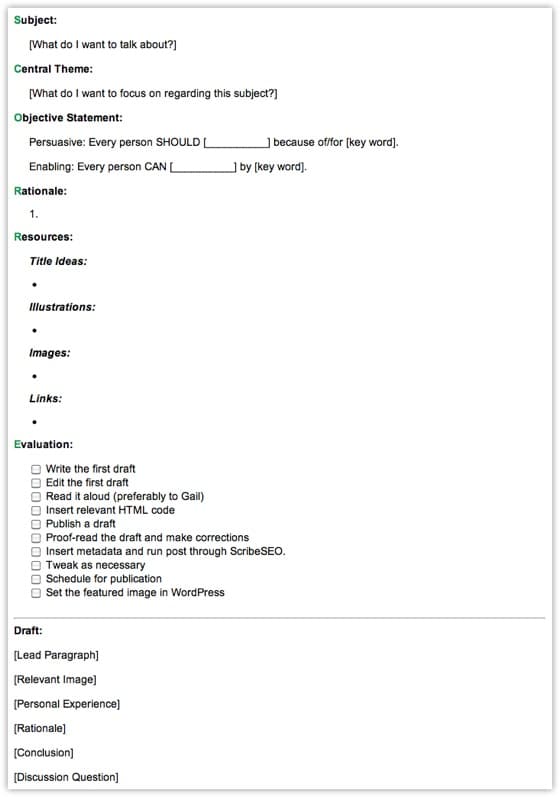
- Set up a blogging template in Evernote. There are certain components that I want to create or collect for every blog post. For example, I am now using the SCORRE™ method from the Dynamic Communicators Workshop (DCW) to prepare every post. This is an acronym for Subject, Central Theme, Objective Statement, Rationale, and Evaluation. I store my template in an Evernote notebook called Templates, along with numerous other templates I use on a regular basis.
The template looks like this:

- Create a new note for every blog post idea. Whenever I have a blog post idea, I go to my Template notebook, select my Blog Post Idea template, right click on it, and select Copy to Notebook. This puts a fresh copy of the template in my Blog notebook, complete with a “post ideas” tag. I then give the note title a unique name (the working title for the post) and then fill out as much of the not as I have the time and inclination to do. As a result, at any one time, I have dozens of post ideas in various stages of completion.
- Assemble the various post components. When I get ready to really work on a blog post, I begin assembling the various pieces. I usually begin with the subject and the central theme. Then I add whatever is easiest to add first. It might be the relevant links, a few images, and then the objective statement. (I don’t have space in this post to go through what these elements are. If you want to learn the SCORRE™ method, I highly recommend DCW. You can get a $200 discount by using the special discount code: HYATTVAIL) Although it is primarily designed as a speech preparation tool for public speakers, it works equally well for bloggers.
- Write your blog post in Evernote. I write the first draft of my post in in Evernote. i like having everything in one place. I don’t worry about formatting. I just try to get the post out, resisting the urge to edit my work as I am creating it. Once I have the first draft, I go back through and edit it. Once I have a stable draft that I am relatively happy with, I am done in Evernote.
The completed note may look like this:

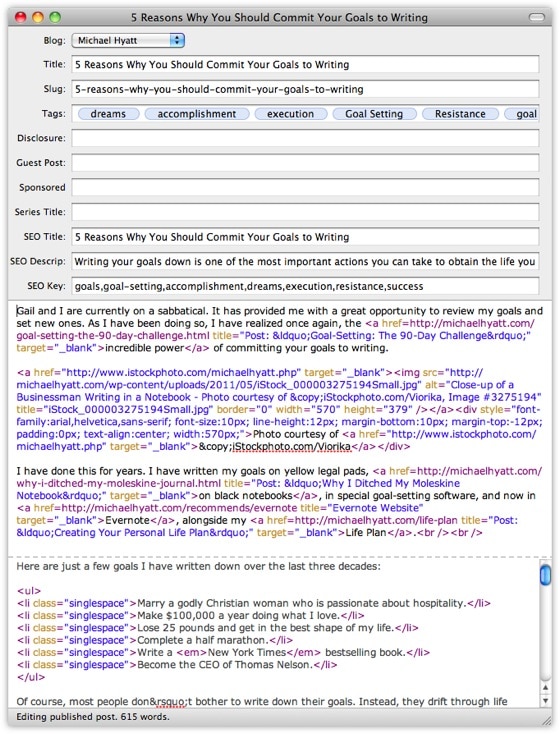
- Copy your post to your blogging software. I select all the text in my post and copy it to MarsEdit, my blogging software of choice. This is where I add the metadata (i.e., post category, tags, and description). I also add all the formatting, including bold text, italics, lists, and other styling. I like a lot of control, so I personally work in HTML mode. However, this is not necessary for most bloggers. In fact, you could copy and paste your draft directly into WordPress.
Here’s what blog post looks like in MarsEdit. Keep in mind that this is HTML code.

- Schedule the post and review your work. When I am happy with my work, I edit the date I want the post to appear. I always schedule mine for 4:00 a.m. CDT. I then upload the post to WordPress. I then usually preview the post and review it on my site. The post isn’t live yet, but it gives me a chance to see the post in my blogging environment. I then proofread it a couple of more times and declare it done.
Evernote has enabled me to be more productive in my blogging. I love having one place where I can store everything.
- How to Organize Evernote for Maximum Efficiency
- How to Use Evernote If You Are a Speaker or Writer
- How to Use Evernote with a Traditional Paper Notebook
- How to Use Evernote with an iPad to Take Meeting Notes
- How to Email Your Documents Directly to Evernote
- How to Scan Documents Directly into Evernote
- How to Get Your Stuff into Evernote
- Is Your Data Safe in Evernote?
- How to Use Evernote as a Blogger
- How to Find Your Stuff in Evernote
- 7 Evernote Resources You May Not Know About
- How to Get Your Kindle Highlights into Evernote
Disclosure of Material Connection: Some of the links in the post above are “affiliate links.” This means if you click on the link and purchase the item, we will receive an affiliate commission. Regardless, we only recommend products or services we use and believe will add value to our readers. We are disclosing this in accordance with the Federal Trade Commission’s 16 CFR, Part 255: “Guides Concerning the Use of Endorsements and Testimonials in Advertising.


