It is no secret that I am a big fan of Evernote. It is one of those amazing tools that can radically boost your productivity. I use it probably more than any other program other than Mac Mail. It has enabled me to realize my dream of a paperless office.

But Evernote can also be initially intimidating. The program is so deep and feature-rich that new users hardly know where to start. It is like buying a Swiss Army Knife. I personally used it for two years for little more than typing meeting notes into it.
Now, after several months of really exploring the program, I have discovered ten different tools for getting my content into Evernote:
- Type It. You can create a note and start typing. I find this particularly helpful for brainstorming, taking meeting notes (especially on the iPad), outlining a speech, or even—as I am doing now—writing a blog post.
- Email it. You can forward any email to your unique Evernote address, and it will show up in your default notebook a few seconds later. I do this several times a day. I often add additional comments to the note and tag it.
- Scan it. While I have gone paperless in my office, not everyone else in the world has. As a result, I still must process paper. If I determine that I need to save a copy of the letter, invoice, invitation, etc., I scan it directly into Evernote with my ScanSnap scanner. I then toss the paper into the recycling bin.
- Clip it. When I encounter an interesting blog post or web page, I use the Evernote extension for Chrome to clip the entire page directly into Evernote. When I do so, I can assign it to a notebook and add any relevant tags. Evernote has these extensions or add-ins available for most browsers.
- Paste it. Sometimes, I don't want to save an entire email message or a web page. Perhaps I just want to save a quote, an image, or some other interesting item. No problem. I just select the text, copy it to the clipboard, and then use a keyboard shortcut to save whatever is on the clipboard to a new note.
- Drag it. If I have a file I want to save to Evernote, I can select it in Finder and then drag it to the Evernote icon on the dock. Evernote then creates a new note with the file attached. Note: With the free version of Evernote, you are limited to image, audio, ink, and PDF files. With the premium version, you can attach any kind of file.
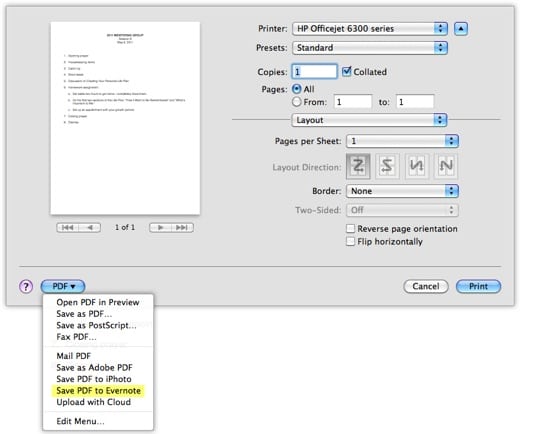
- Print it. If you are working on a file in another program and want to save a copy in Evernote, you can select File | Print and then (at least on a Mac) “print” a PDF of the file to Evernote. Note that when you save a PDF to Evernote, it becomes fully searchable.

- Record it. Admittedly, I don't use this much, but you could use this to record a note to yourself, a phone conversation, a meeting, or a lecture. (Make sure you first familiarize yourself with the laws pertaining to recording these various items.) This option is especially handy on the iPhone when you want to record an idea but aren’t in a position to type it.
- Photograph it. This is particularly useful with the iPhone. I use it all the time. Recently, for example, Gail and I were shopping for a couple of side chairs for my home office. We took pictures of the ones we liked and stored them in Evernote. It was the a simple matter of reviewing them when we got home. I have taken pictures of medications, license plates, and printer cartridges, etc. As an added bonus, Evernote indexes all the text in the picture.
- Automate It. This is a bit technical, but I found it worth the effort. You can create a new “Mac service” that allows you to right-click on a file in Finder and send it directly to Evernote. You can also create an Auto Import folder using the Mac's “Folder Actions.” Once you set it up, any file you save or drag into that folder will be immediately added to Evernote. I didn’t know what any of this meant until I set it up, using the links I have provided. It took me about 20 minutes to do it.
You don’t have to use all of these techniques, of course. However, I think it is worth familiarizing yourself with them, so you know what tools you have in the tool chest. You can then select the appropriate tool for the job. My goal has to make these second-nature, so that I can quickly add items to Evernote and keep working on the task at hand.
- How to Organize Evernote for Maximum Efficiency
- How to Use Evernote If You Are a Speaker or Writer
- How to Use Evernote with a Traditional Paper Notebook
- How to Use Evernote with an iPad to Take Meeting Notes
- How to Email Your Documents Directly to Evernote
- How to Scan Documents Directly into Evernote
- How to Get Your Stuff into Evernote
- Is Your Data Safe in Evernote?
- How to Use Evernote as a Blogger
- How to Find Your Stuff in Evernote
- 7 Evernote Resources You May Not Know About
- How to Get Your Kindle Highlights into Evernote
Disclosure of Material Connection: Some of the links in the post above are “affiliate links.” This means if you click on the link and purchase the item, we will receive an affiliate commission. Regardless, we only recommend products or services we use and believe will add value to our readers. We are disclosing this in accordance with the Federal Trade Commission’s 16 CFR, Part 255: “Guides Concerning the Use of Endorsements and Testimonials in Advertising.


